Contributing
dms-vep.org is a repository for deep mutational scanning (DMS) studies with a focus on viral entry proteins (VEPs). The site contains a series of write-ups on individual deep mutational scanning experiments for a variety of viruses and conditions. This guide contains instructions for how to contribute your experimental write-ups.
There are three parts to this guide:
- Getting Started: How to add a new write-up and view the updated website.
- Writing Markdown: How to take advantage of the VitePress markdown interpreter.
- Style Guide: How to structure your experimental write-ups.
Getting Started
dms-vep.org is based on the static site generator VitePress with some additional custom components written in Vue. This allows you to create fully functional web pages using Markdown documents. To add a new page to the site, you simply create a markdown document in the correct directory and make a pull request to the website repository on GitHub. Below are detailed instructions on how to do this.
Setting up to contribute
Since contributions are made through GitHub, the first thing you'll need to do is clone the repository locally:
git clone git@github.com:dms-vep/dms-vep.github.io.git
cd dms-vep.github.io
Now that you have the repository and you're in the dms-vep.github.io directory, you'll need to set up a few things if you want to view a live preview of the website with your local changes. You're going to need two pieces of software to do this: Node.js and npm.
Node.js is an environment that allows you to run Javascript code on your computer. npm is a package manager that contains the Javascript libraries necessary to create the website. The instructions for installing Node and npm depend on your operating system and personal preference. Follow the instructions here.
TIP
If you have conda installed, you can use conda to install node and npm.
conda env create -f environment.yml
conda activate dms-vep.org
To verify that Node and npm are installed, run:
node -v
npm -v
You should see the node and npm versions that you installed on your system.
If this is the first time you're contributing, you'll need to install all of the packages in packages.json. To do this, run the following command from within the repository:
npm installWith everything installed, you can now boot up a live preview of your local version of dms-vep.github.io on your browser. To do this, simply run:
npm run docs:devNow, there will be a local version of the website running at http://localhost:5173. Visit this URL in your browser to see a preview of the site.
IMPORTANT
If you are developing dms-vep.org from a remote sever (not your local machine), use
npm run remote:docs:devand access the preview at the url provided under Network
Structure of the repository
The file structure of this website is as follows:
.
├── README.md
├── about.md
├── contributing.md
├── experiments
├── index.md
├── methodology.md
├── package-lock.json
├── package.json
└── public
Any file ending *.md is converted to a page on the site. Individual experiments are located in the experiments/ directory.
.
├── experiments
   ├── hiv
   │   └── index.md
   ├── influenza
   │   └── index.md
   ├── lassa
   │   └── index.md
   ├── nipah
   │   └── index.md
   └── sars2
       ├── index.md
       └── posts
           ├── delta-spike-REGN10933.md
           └── omicron-spike-mABs.md
The landing page for a given virus is located at experiments/<virus>/index.md. Editing the contents of this file will determine the content of the landing page.
Experiments for a given viral protein are located in a corresponding viral subdirectory underneath another directory called posts/. The markdown files in the experiments/<virus>/posts/ directory contain the write-ups for each DMS experiment.
Adding your experiments
Fundamentally, adding an experimental write-up involves adding a new markdown file in the experiments/<virus>/posts/ directory for your viral protein. The name of the file doesn't matter. Any markdown file you add in a posts directory will be indexed by the website on build and added as a page to the site.
However, there are some nuances to adding your experimental write-up. At the top of every markdown file, you have to add a YAML header that contains important metadata about your experiment. Here's an example of what that header looks like:
---
title: 'Deep mutational scanning of SARS-CoV-2 Delta variant spike using a barcoded lentiviral platform'
author:
    - Bernadeta Dadonaite
    - Jesse Bloom
date: 2022-10-07
github: https://github.com/dms-vep/SARS-CoV-2_Delta_spike_DMS_REGN10933
paper: https://doi.org/10.1016/j.cell.2023.02.001
subtext: This is some test of the subtext, what's the experiment about? Here's a short plain text introduction.
keywords:
    - Delta
    - Spike
    - Lentiviral Pseudotyping
---

Then your write-up goes here...
Ensure that every write-up contains the headers listed above. These pieces of metadata will appear in the index of experiments for a given virus. The title will appear as the title, the subtext will appear as a description below the title, and the keywords are used to filter the write-ups listed in the index.
Finally, if this is your first time contributing to dms-vep.github.io, make sure to update the public/contributors.json file with your name, a link to a photo, and a link to your personal or lab website:
[
    {
        "name": "Jesse Bloom",
        "image": "https://research.fredhutch.org/content/stripe/bloom/en/members/_jcr_content/par/labmember/image.img.jpg/1540125095310.jpg",
        "link": "https://research.fredhutch.org/bloom/en/members.html"
    },
    {
        "name": "Your Name",
        "image": "https://my/awesome/photo.jpg",
        "link": "https://my-personal-webiste.com"
    },
    ...
Updating the landing page for a protein
You can also update the landing page for a viral protein with links to the most recent datasets, specific background information, highlighted datasets, and more. To edit the content of the landing page, edit the experiments/<virus>/index.md file for your viral protein. Similar to adding a new post, the content of the page is written fully in markdown with a YAML header that determines the properties of the page. For example, here's the page for SARS-CoV-2:
---
layout: doc
aside: false
dir: 'sars2'
title: SARS-CoV-2
subtext: Below are deep mutational scanning experiments of the SARS-CoV-2 Spike protein. See the details below for the best datasets for different research questions.
pins:
  - title: ACE2 Binding affinity
    link: /experiments/sars2/posts/delta-spike-REGN10933
    details: Here is the best data to checkout if you're interested in ACE2 Binding affinity
    linkText: Check it out!
  - title: Monoclonal Antibody Escape
    details: Here is a guide for monoclonal antibodies mapped against the most current strain
    link: /experiments/sars2/posts/XBB.1.5_ACE2_binding_serum_escape_cell_entry
    linkText: Check it out!
  - title: Serum Escape
    details: Here is a guide to human serum escape mapped against the most current strain
    link: /experiments/sars2/posts/XBB.1.5_ACE2_binding_serum_escape_cell_entry
    linkText: Check it out!
---

<Header :title="$frontmatter.title" :description="$frontmatter.subtext" />

<PinnedExperiments />

<!-- Edit below -->
...
<!-- Stop editing -->

<Experiments :currentDirectory="$frontmatter.dir" />
When creating a new landing page for a viral protein, use this as the template. Your custom content is added in two places. First, you can customize the YAML frontmatter:
---
layout: doc
aside: false
dir: 'sars2'
title: SARS-CoV-2
subtext: Below are deep mutational scanning experiments of the SARS-CoV-2 Spike protein. See the details below for the best datasets for different research questions.
pins:
  - title: ACE2 Binding affinity
    link: /experiments/sars2/posts/delta-spike-REGN10933
    details: Here is the best data to checkout if you're interested in ACE2 Binding affinity
    linkText: Check it out!
  - title: Monoclonal Antibody Escape
    details: Here is a guide for monoclonal antibodies mapped against the most current strain
    link: /experiments/sars2/posts/XBB.1.5_ACE2_binding_serum_escape_cell_entry
    linkText: Check it out!
  - title: Serum Escape
    details: Here is a guide to human serum escape mapped against the most current strain
    link: /experiments/sars2/posts/XBB.1.5_ACE2_binding_serum_escape_cell_entry
    linkText: Check it out!
---
Make sure to follow these instructions.
- Please don't edit the values of
layoutoraside. - Ensure that the value of
dirmatches the name of the parent directory ofindex.md. - The value of
titlewill appear as a header at the top of the page. - The value of
subtextwill show up as a short description below thetitle. - You can 'pin' specific datasets at the top of the page using the
pinskey. Please provide a shorttitleand alinkto the post that you're pinning. You can also provide a short description with thedetailskey. See the SARS-CoV-2 Spike landing page for an example of what this looks like.
You can also edit the landing page of a virus by adding some markdown to the page just like you would for a normal experimental post. To do this, add your markdown content between the comments that indicate where you should edit:
<Header :title="$frontmatter.title" :description="$frontmatter.subtext" />

<PinnedExperiments />

<!-- Edit below -->
Add your custom content here!
<!-- Stop editing -->

<Experiments :currentDirectory="$frontmatter.dir" />
Writing Markdown
Writing in markdown for dms-vep.github.io is essentially the same as writing a normal markdown file with some added features. Many of these features are extensions provided by VitePress. For a detailed guide to these extensions, check out the VitePress documentation here. However, there are some additional features to be aware of for dms-vep.github.io.
Adding images
To add images, you can use normal markdown syntax while providing a link to where an image is stored on the web. For example, here's some markdown that displays an image of the Snakemake rulegraph for an analysis pipeline:
Which results in an image being displayed on the webpage like this:

Adding Altair plots
To add Altair plots, you'll need to use a custom syntax and provide a link to either an HTML page that contains your plot (i.e. a page like this), or a raw JSON file exported from Altair.
To add you're Altair plot simply use the following syntax:
<Altair :showShadow="true" :spec-url="'https://raw.githubusercontent.com/dms-vep/SARS-CoV-2_Delta_spike_DMS_REGN10933/main/docs/REGN10933_escape_plot.html'"></Altair>Where the :spec-url points to either a JSON or HTML file exported from Altair. It's key that this file comes from GitHub, and that the URL points to the raw data (i.e. the URL starts with https://raw.githubusercontent).
Note
You can provide a path to a local file as well. Place the HTML file in a subdirectory of public/ (i.e. public/htmls/). Don't include public in the path. Also, make sure to have a leading / in the path. For example:
/htmls/path-to-my-altair-plot.htmlYou can also toggle whether you want to show a shadow around your plot by setting :showShadow to false (i.e. :showShadow="false").
The result will look something like this:
Adding views of dms-viz
You can also include views of websites like dms-viz.github.io in your write-ups using iframes. These are HTML elements that take a URL and generate a view of that website within another website. You can use them like this:
<iframe
  src="https://dms-viz.github.io/v0/?data=https%3A%2F%2Fraw.githubusercontent.com%2Fdms-viz%2Fconfigure_dms_viz%2Fmain%2Ftests%2FHIV-Envelope-BF520-DMS%2Foutput%2FHIV-Envelope-BF520-DMS.json&e=IDC508&ce=%255B%25221%2522%252C%25222%2522%255D"
  width="100%"
  height="600px"
  style="border:0; margin: 0 auto; display: block; box-shadow: 0 4px 8px 0 rgba(0, 0, 0, 0.2), 0 6px 20px 0 rgba(0, 0, 0, 0.19);">
</iframe>
Which will result in a view of the URL provided to the src property of the iframe. The result looks like this:
You can simply copy this code and replace the URL with the URL to your website of choice.
Adding figure captions
If you want to add captions to images, iframes, or Altair plots, you can do so with the following syntax:
For images, you specify either the path to the image or the image URL to the imageSrc argument. You specify the caption to the caption argument.
<Figure imageSrc="./antibody_selection.png" caption="This is an example of a caption for this image" />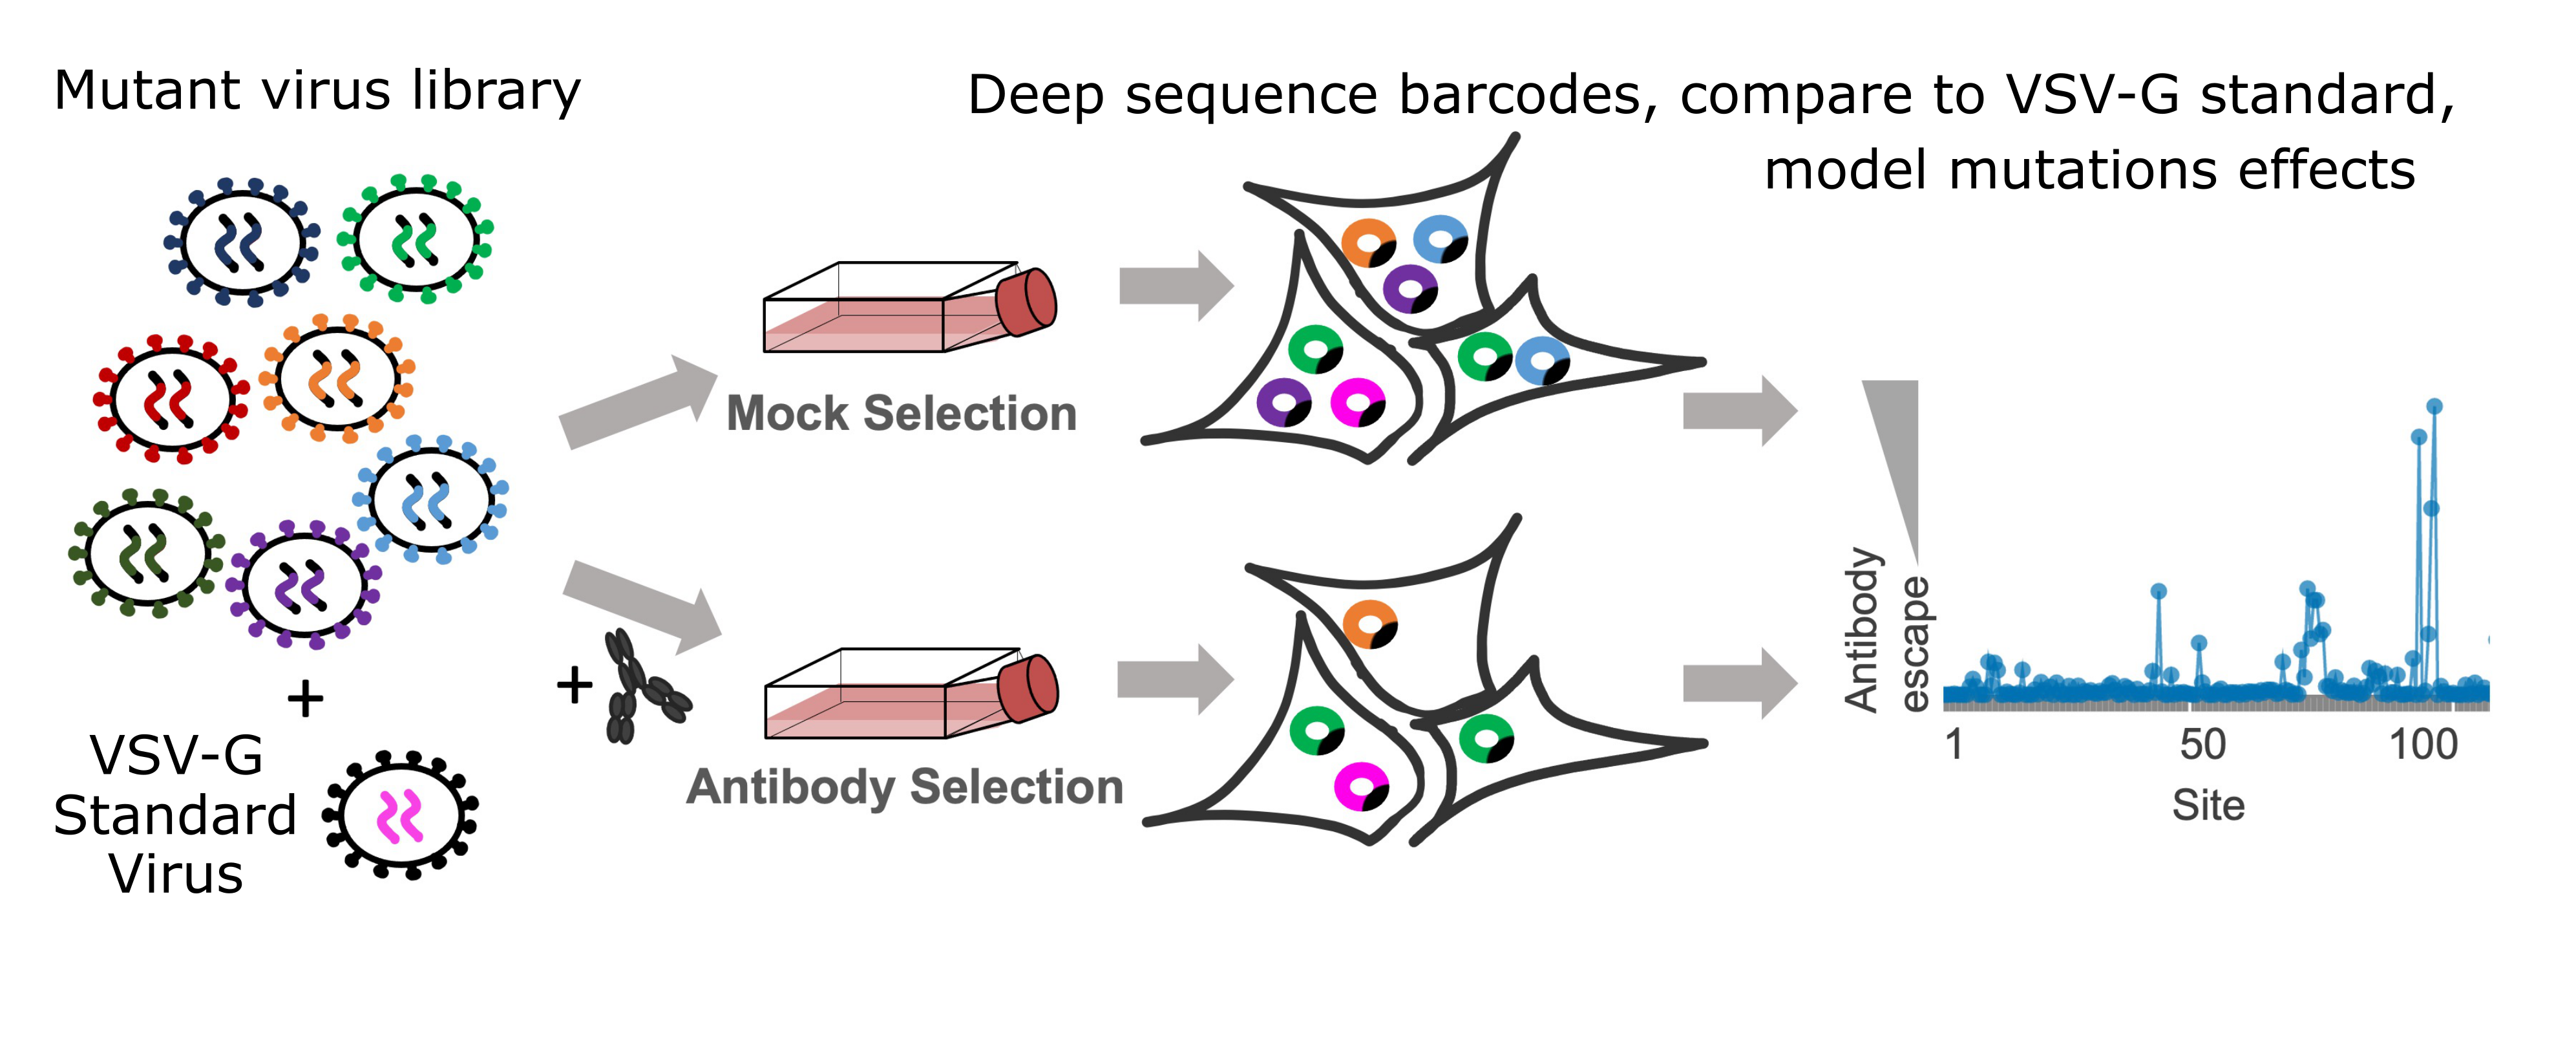
The only difference between Altair plots (and other HTML elements) and images is that you don't use the imageSrc argument. Instead, you wrap the element in the Figure element like below:
<Figure caption="This is an example of  a caption for this image">
    <Altair :spec-url="'https://raw.githubusercontent.com/dms-vep/SARS-CoV-2_Omicron_BA.2_spike_ACE2_binding/main/docs/htmls/monomeric_ACE2_mut_effect.html'"></Altair>
</Figure>